概述
本文主要讲解spring-security相关的一些基本概念,熟悉一些相关的类和认证大概流程。不涉及源码的探讨,为接下来的几篇深入解析作铺垫。本文以及接下来的文章使用的Spring Boot版本为:
1
2
3
4
5
| <parent>
<groupId>org.springframework.boot</groupId>
<artifactId>spring-boot-starter-parent</artifactId>
<version>2.1.5.RELEASE</version>
</parent>
|
spring-security简述
概念
spring-security是一个功能强大且可高度自定义的身份验证和访问控制框架。 它是保护基于Spring的应用程序的事实标准。
运行原理
spring-security是通过过滤器链对web请求进行拦截,不同的过滤器按照定义的拦截规则对相应的请求进行拦截然后进行处理。
spring-security基本过滤链
新建Spring Boot工程,添加spring-security依赖:
1
2
3
4
| <dependency>
<groupId>org.springframework.boot</groupId>
<artifactId>spring-boot-starter-security</artifactId>
</dependency>
|
开启debug调试:
1
2
3
| logging:
level:
org.springframework.security: debug
|
启动项目,从控制台打印的信息可以看到,spring-security为当前项目添加了一个DefaultSecurityFilterChain,该过滤器链包含以下过滤器:
1
2
3
4
5
6
7
8
9
10
11
12
13
14
15
| WebAsyncManagerIntegrationFilter
SecurityContextPersistenceFilter
HeaderWriterFilter
CsrfFilter
LogoutFilter
UsernamePasswordAuthenticationFilter
DefaultLoginPageGeneratingFilter
DefaultLogoutPageGeneratingFilter
BasicAuthenticationFilter
RequestCacheAwareFilter
SecurityContextHolderAwareRequestFilter
AnonymousAuthenticationFilter
SessionManagementFilter
ExceptionTranslationFilter
FilterSecurityInterceptor
|
这些过滤器从上往下的顺序代表了执行的先后顺序。
Spring-Security核心认证类
从上面的过滤器链中,我们可以猜想既然是过滤链,那么是不是会存在一个东西从请求进入过滤链到请求结束,扮演着某个角色,代表着过滤所得到的结果呢?答案是肯定的,其实spring-security的整个认证和授权最终就是围绕着这个东西进行的。
SecurityContext
记住这个类是贯穿整个过滤器链的,后续一系列的认证授权都是围绕它展开的。它的实现类只有一个SecurityContextImpl,这个类从名字上可以看出它代表的是安全上下文信息,看一下SecurityContextImpl类:
1
2
3
4
5
6
7
8
9
10
11
12
13
14
15
16
17
18
19
20
21
22
23
24
25
26
27
28
29
30
31
32
33
34
35
36
37
38
39
40
41
42
43
44
45
46
47
48
49
50
51
52
53
54
55
56
57
58
59
60
61
62
63
64
65
| public class SecurityContextImpl implements SecurityContext {
private static final long serialVersionUID = SpringSecurityCoreVersion.SERIAL_VERSION_UID;
private Authentication authentication;
public SecurityContextImpl() {}
public SecurityContextImpl(Authentication authentication) {
this.authentication = authentication;
}
@Override
public boolean equals(Object obj) {
if (obj instanceof SecurityContextImpl) {
SecurityContextImpl test = (SecurityContextImpl) obj;
if ((this.getAuthentication() == null) && (test.getAuthentication() == null)) {
return true;
}
if ((this.getAuthentication() != null) && (test.getAuthentication() != null)
&& this.getAuthentication().equals(test.getAuthentication())) {
return true;
}
}
return false;
}
@Override
public Authentication getAuthentication() {
return authentication;
}
@Override
public int hashCode() {
if (this.authentication == null) {
return -1;
}
else {
return this.authentication.hashCode();
}
}
@Override
public void setAuthentication(Authentication authentication) {
this.authentication = authentication;
}
@Override
public String toString() {
StringBuilder sb = new StringBuilder();
sb.append(super.toString());
if (this.authentication == null) {
sb.append(": Null authentication");
}
else {
sb.append(": Authentication: ").append(this.authentication);
}
return sb.toString();
}
}
|
内部结构很简单,只包含了一个Authentication,代表的是认证信息。
Authentication
它的含义可以理解成“认证信息”,也就是说从请求开始,这个认证信息可能是没有被认证的,到请求结束可能已经变成已认证了。它的状态是会变化的。让我们来看一下和Authentication相关的类图:
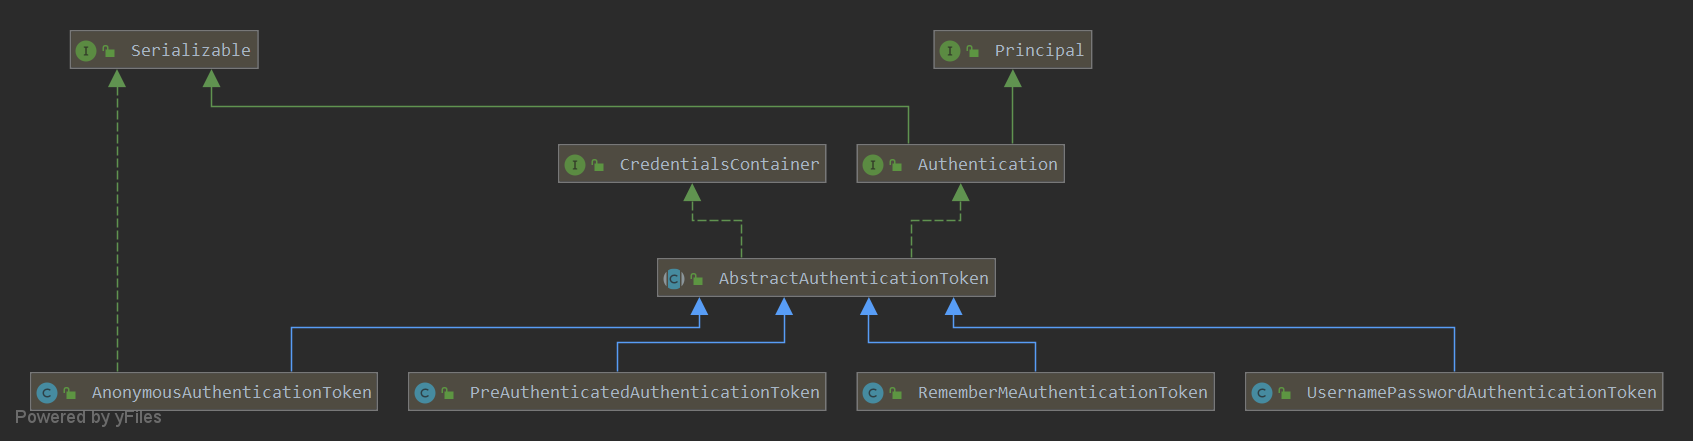
从上图可以看出Authentication类在整个认证类图中属于顶级接口:
1
2
3
4
5
6
7
8
9
10
11
12
13
14
15
16
17
18
19
20
21
22
23
24
25
26
27
28
29
| package org.springframework.security.core;
import java.io.Serializable;
import java.security.Principal;
import java.util.Collection;
import org.springframework.security.authentication.AuthenticationManager;
import org.springframework.security.core.context.SecurityContextHolder;
public interface Authentication extends Principal, Serializable {
Collection<? extends GrantedAuthority> getAuthorities();
Object getCredentials();
Object getDetails();
Object getPrincipal();
boolean isAuthenticated();
void setAuthenticated(boolean isAuthenticated) throws IllegalArgumentException;
}
|
Authentication类的一些实现类
从类图中可以看出具体的实现类主要有以下几种:
1
2
3
4
5
| AnonymousAuthenticationToken
PreAuthenticatedAuthenticationToken
RememberMeAuthenticationToken
UsernamePasswordAuthenticationToken
...
|
常用的认证令牌有以上几种(省略的其它几种令牌),它们都继承了AbstractAuthenticationToken类,因此它们都是属于认证令牌。仔细对比这四个类可以发现它们都拥有2个构造函数,并且AnonymousAuthenticationToken和RememberMeAuthenticationToken的2个构造函数最终都调用了setAuthenticated(true)方法将当前主体设置为已认证了,而UsernamePasswordAuthenticationToken和PreAuthenticatedAuthenticationToken的第一个构造函数都把authenticated设置成了false,第二个构造函数将authenticated设置成了true。其实这四种令牌是属于两种类型的令牌:
第一类:
1
2
| AnonymousAuthenticationToken
RememberMeAuthenticationToken
|
这一类令牌spring-security认为这是属于已认证的令牌(例如某论坛的帖子是可以匿名查看的,对应的接口就是可以匿名访问的,此时整个请求流程中的Authentication就是AnonymousAuthenticationToken)
第二类:
1
2
| PreAuthenticatedAuthenticationToken
UsernamePasswordAuthenticationToken
|
这一类令牌是在进行认证时需要用到的令牌信息(例如,用户使用用户名和密码登录时,就会根据用户名和密码生成一个令牌,此时整个请求流程中的Authentication就是UsernamePasswordAuthenticationToken)
总结
spring-security是通过一系列的过滤器组成一个过滤链来对请求进行拦截,进而认证授权的
整个请求过程中会填充一个SecurityContext对象,包含一个Authentication信息,充当认证信息